![]()
Well, I finally did it. 🙂 I released my first plugin on the WordPress repo (or is it called the “directory” now?). Lots of folks don’t really encourage this type of behavior. There are plenty who believe the hassle of the support requests outweighs the joy of sharing something cool with the world. For me, the verdict is still out. I’m optimistic that the plugin is simple enough that it won’t cause too many problems. Only time will tell.
As I increased my knowledge and skills with developing in WordPress, like most things I’m sure, I learned quickly how deep the rabbit hole goes and how much I have to learn.
One of the more valuable functions I learned about (and am still learning about) are hooks. If you are not familiar, these are little lines of code, inserted into the core software (be it WordPress itself, a plugin or a theme) that are designed to allow the developer to “hook” into them and add their own code. In the WordPress world, there are 2 main types: Actions and Filters. I won’t go into much detail as there is no shortage of articles about these things. If you are not familiar, go do some Googling.
The main difference between the two kinds of hooks is an “action” hooks allow you to add your own code and have that code run (depending on your priority) right where that hook is located in the main code. “Filter” hooks essentially allow you to take a given piece of data, manipulate it, then return it back to the program. I’m still working on mastering “filters”, so bear with me and my cryptic description. I promise I’ll add more at some point in the future.
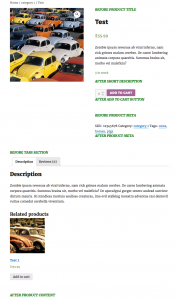
For my plugin, I focus on the “action” hooks inside of WooCommerce (and there’s a ton). The image here is from the actual plugin. My intention is to show where you can add your own text. The beauty of this plugin (if I do say so myself) is that you can add your own text/html without having to write your own hook. In theory, there’s no programming involved, but you can still take advantage of the hooks functionality.
 I made it really small, but you can click on it and view it full size. The text you see that is bold, italic and green is the text area the plugin gives you access to. I tried to use names that were similar to the actual hook name that I’m referencing in the code. For example, below the SKU, Categories and Tags is the “After Product Meta” hook. By adding your own text in this field of the plugin, you can output some of your own text right in that section.
In the development of the plugin, I started out using the amazing plugin “Advanced Custom Fields”. By “embedding “that plugin into my own, it made the creation of the admin page much easier and simplified the creation of the fields. All that said, there were (and are) too many potential issues that arise when you bury another plugin inside your own. If the user already has ACF (or ACF Pro) that can cause issues. If their version is ahead or behind the version of my plugin it can hiccup as well. So with that in mind, I converted the plugin to use the standard WordPress custom fields. This was a bit more of a learning curve for me, but I feel better about how the plugin is organized and it feels much more simple now. There are fewer moving parts.
Lastly today, I figured I’d explain how my plugin works.
Functionally, we simply show the user which fields to use in order to add content in that specific section. You can use the graphics included to pick your spot. Beyond that, I’m just going to explain the hooks I created in hopes that it could clear up the function of these fantastically useful tools.
Here’s the scoop:
On line 28 “woocommerce_product_meta_end” is the name of the hook contained inside of WooCommerce. “HookyWoo_after_product_meta_content” is the name of MY function that I’m adding onto the existing hook from WooCommerce. This can be called anything you want, like: “my_awesome_hook” as long as it is in “slug” form, so no spaces, etc.
On line 29, this is the actual function that my code is going to do. You can see that the function has the same name as my hook does on line 28. It should be noted that line 28 can be put down below line 31 (below the function code), but I just prefer to put it above.
Line 30 is the magic that happens when my hook runs. At first, we’re echoing a new div (so the folks using my plugin can style their own text). Then we are using the get_option code to pull the “after_product_meta” field data from out of the database (it’s in the options table). After that, we just close up the div so there are no funky styling issues.
If you were aware of a hook you wanted to manipulate or add to, you could copy/paste this code into your functions.php file (in your child theme of course) and swap out “woocommerce_product_meta_end” with your own hook from your plugin, theme or WP core, then swap out the actual function code and it would work swimmingly. (OK, chances are it would take a bit of tweaking, but in theory, it would work great.
One thing not covered here is the priority. In some cases, there are already functions “hooked” into a plugin’s hook. For example, a hook that is included in a plugin could have 5 different hooks included by default. The trick for you as the developer is to ensure that you give YOUR hook the priority which is going to cause your function to run in the order you desire.
In the example above, I made note of (commented out) the existing hooks that WooCommerce includes as part of the “woocommerce_after_shop_loop_item_title”. You can see there are 2 additional functions with priorities of 5 and 10 respectively. You’ll also notice that on line 37, I’ve included my own priority with my hook (“5”). So this means that my code (echoing the user’s added text) will be performed BEFORE the “woocommerce_template_loop_price” hook is run (since that has a priority of 10). Now, of course, you would have to know where the hook is going to run and where it is going to spit out ITS code in order for you to accurately choose your priority. This is done with a bunch of testing, trial and error. (ask me how I know!) 🙂
 As you can see from the image to the left, the first arrow is pointing to my hook function. The second arrow is pointing to the price. Looking back at the code from above, the “woocommerce_template_loop_price” has a priority of 10. That means that if I made the priority of my hook “15” (or anything over 10), my hook would actually show up AFTER the price.
OK… That’s all I got for today. The Patriots already got beat by Cam and the Broncos are handling the Raiders right now. Hoping Carr is OK. He just walked to the locker room with an ouchie back.


